Microphone feedback is not simply a volume problem. It begins when sound from a loudspeaker returns to an open microphone. The sound then passes through the sound system again. If the returning signal is strong enough at one frequency, each repeat makes that frequency louder. The result is a ring, a howl, or a high-frequency squeal.
Feedback often appears suddenly. A sound system may seem stable. Then a small gain increase can make one frequency unstable. Feedback can also begin when a microphone moves toward a monitor. It can begin when a performer moves away from the microphone and more gain becomes necessary.
Do not remove every frequency that might cause a problem. The goal is to reach the required sound level before feedback begins. Speech and music should still sound natural.
Feedback is a loop
A live sound signal normally travels from the microphone to the mixer. It then travels through the amplifier and loudspeaker. The loudspeaker sends sound into the room. Some of that sound reaches the microphone again.
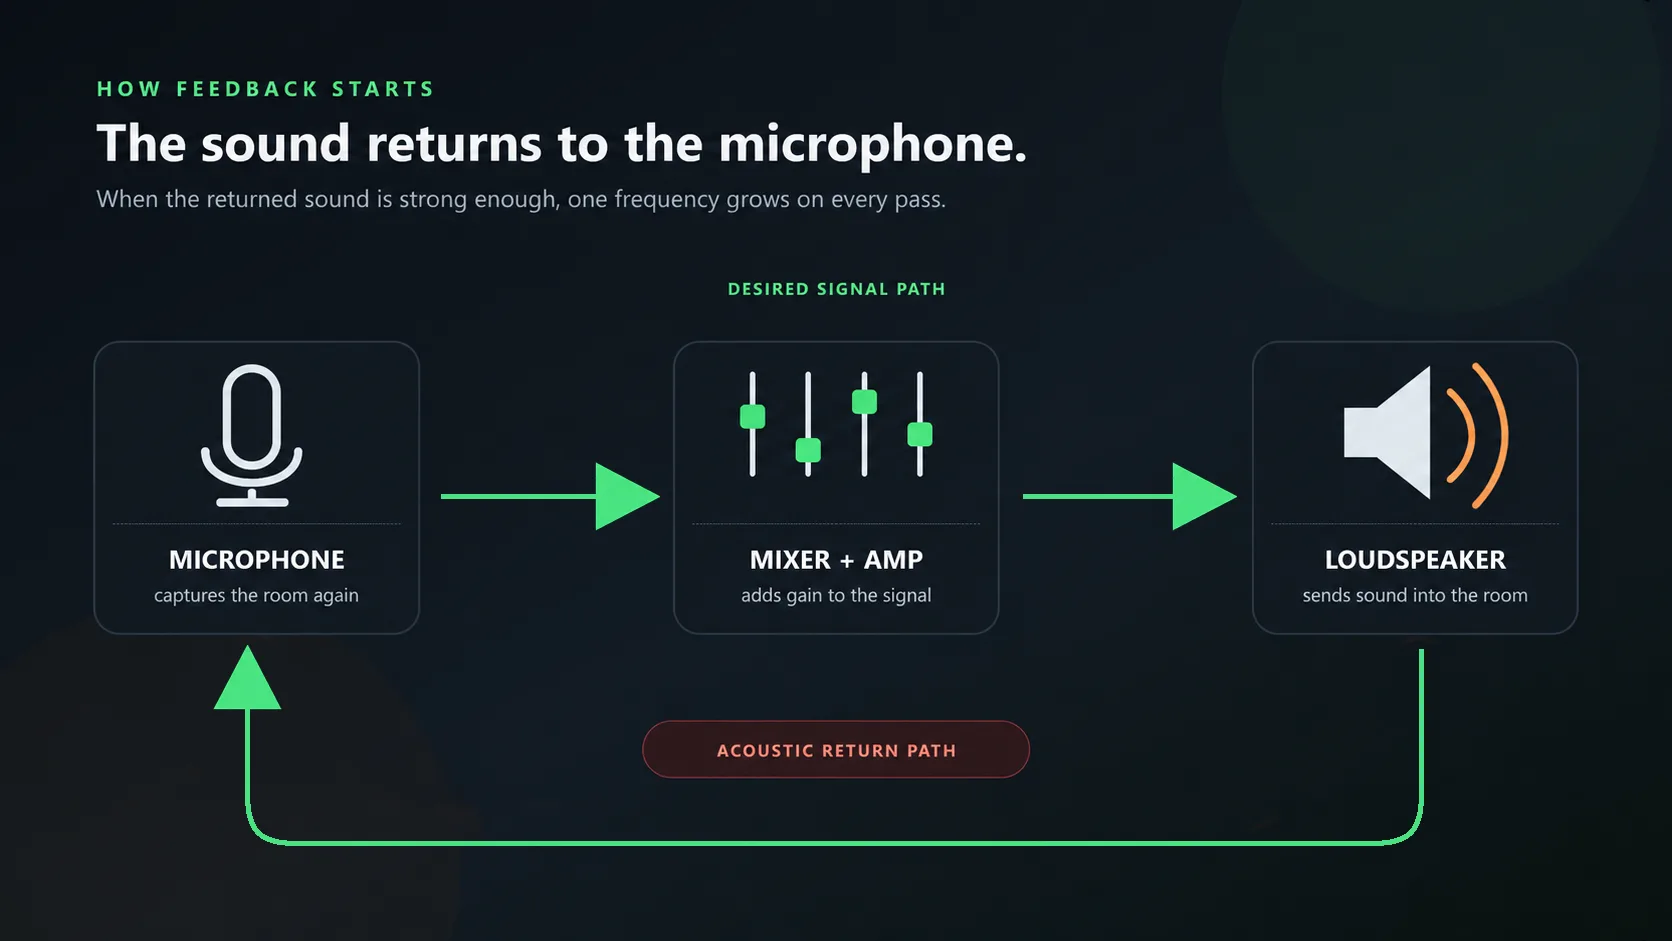
Most returned sound has a low level and does not cause feedback. Feedback starts when the total gain around the loop allows one frequency to continue. Room reflections can increase the returned level. The frequency response of the microphone and loudspeaker also affects the result. Their distance and direction help determine which frequency becomes unstable first.
Shure’s explanation of microphone feedback describes several common causes. A microphone may be too close to a loudspeaker. It may be too far from the wanted sound source. The system may have too much gain. Too many microphones may be open. Room acoustics and uneven system response can also contribute.
Lowering the master fader is not the only solution. The system may need less gain. It may also need better microphone and loudspeaker placement.
Improve the acoustic path before you use EQ
First, move the microphone closer to the voice or instrument when possible. A stronger direct signal needs less electronic gain. The sound that returns from the loudspeaker is then less likely to create feedback.
Place microphones and loudspeakers so that little loudspeaker sound enters the microphone. A directional microphone can help. Aim its least sensitive direction toward the relevant monitor or loudspeaker.
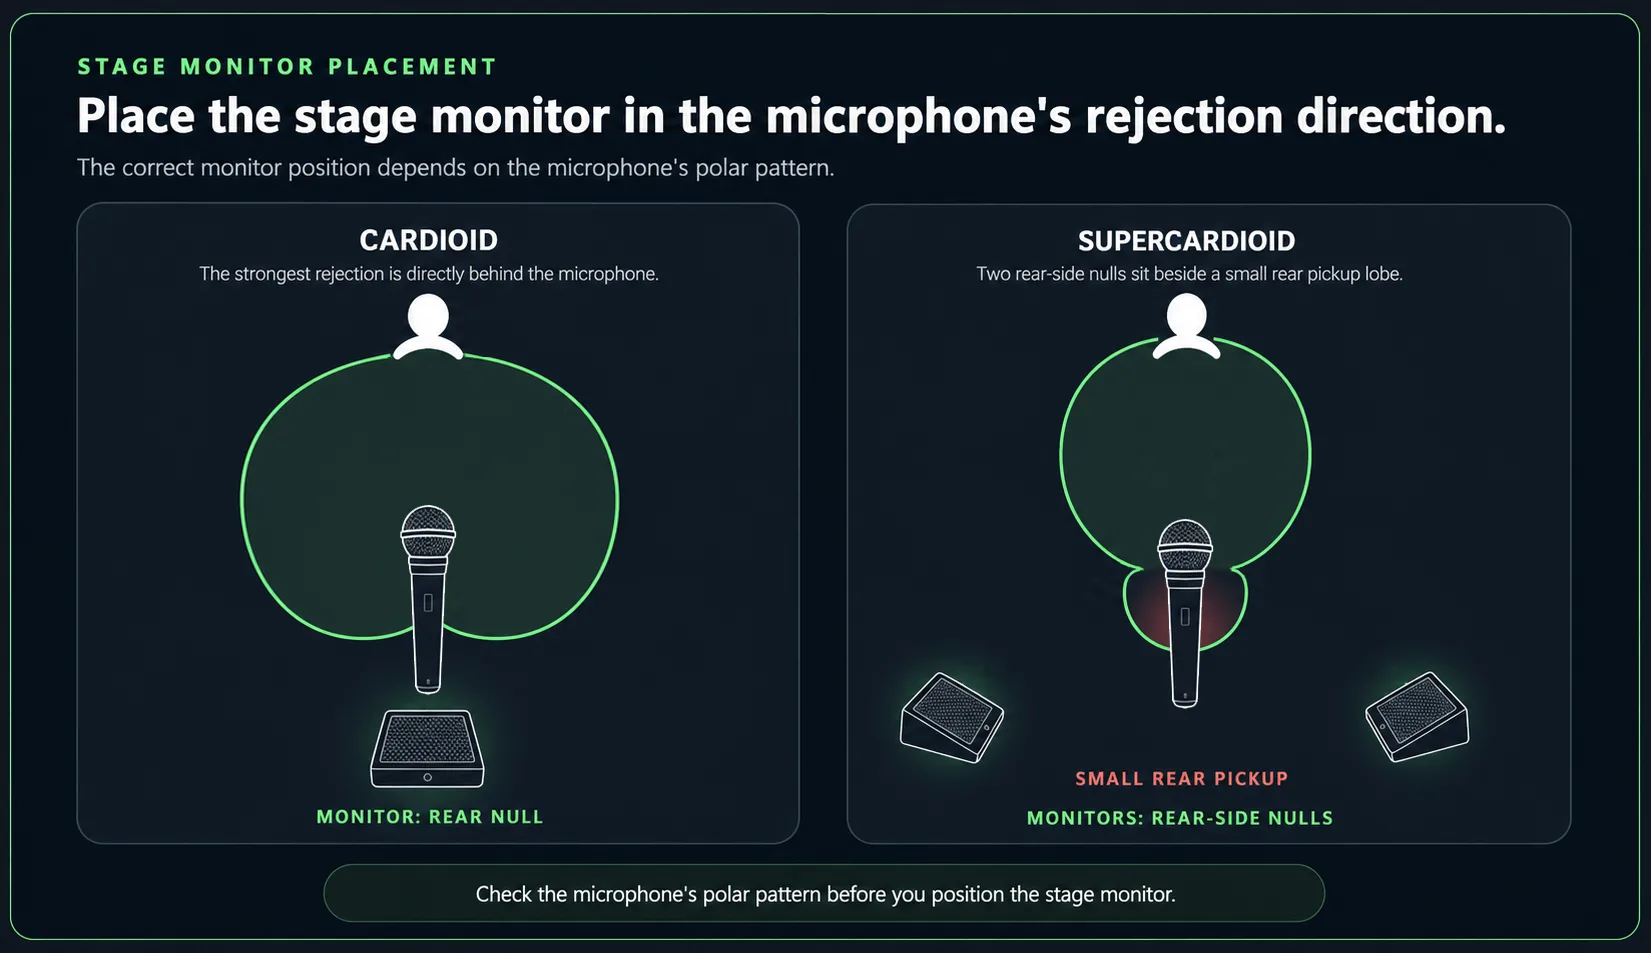
This detail is important for common stage microphones. A cardioid microphone usually rejects sound most strongly from the rear. A stage monitor is therefore often placed behind the microphone. A supercardioid microphone has a small rear pickup area. Its strongest rejection occurs at angles to the rear. The best monitor position can therefore move toward the sides. Use the microphone polar pattern to choose the position.
Before changing EQ, check the simple physical relationships:
- Keep the microphone close to the wanted source.
- Increase the distance between the microphone and loudspeaker where possible.
- Aim the microphone’s rejection area toward the stage monitor.
- Keep unused microphones muted or closed.
- Decide whether the monitor needs more level or a clearer mix.
These changes can improve gain before feedback without removing useful frequencies. Shure describes moving the microphone closer to the source as an easy and effective solution. Its gain-before-feedback guidance explains how the distance between each part of the system affects the available level.
Why one frequency rings first
A sound system and a room do not amplify every frequency equally. The microphone response and loudspeaker response create level differences. Reflections from the stage, walls, and ceiling create more differences. One frequency therefore has a stronger return path than other frequencies. That frequency reaches the feedback threshold first.
Feedback has a recognizable pitch for this reason. A low howl may be in the low-mid range. A sharp whistle may be in the upper midrange or high frequencies. Words such as low, boxy, and sharp are not precise enough. Listen to the frequency or measure it in the actual system.
The first audible ring provides useful information. It shows which frequency range becomes unstable first.
Use a graphic EQ to make a precise cut
A graphic equalizer divides the audio spectrum into fixed frequency bands. A 31-band graphic EQ provides approximately one-third-octave control. Live sound systems often use it on a main output or a monitor output. Reduce the band that causes the ringing. This can provide more usable level before the same frequency causes feedback again.
Begin with the EQ set to a flat position. Locate the ringing band. Then reduce only that band by the amount that is necessary. Do not reduce many neighboring bands because the pitch is uncertain. Large or wide cuts can make a vocal thin or dull. They can also reduce speech intelligibility without correcting the placement or gain problem.
Yamaha explains that feedback usually appears at one emphasized frequency. Its official guide shows how a graphic EQ can reduce that frequency band. Yamaha also explains that cuts across too many bands can reduce sound quality and speech intelligibility. See Feedback Control — Using an Equalizer and Feedback Control — Using a Feedback Suppressor.
A practical sequence is:
- Set the microphones, monitors, and main loudspeakers in their real working positions.
- Begin with the relevant EQ flat and the system level low.
- Raise the working level slowly while someone uses the microphone normally.
- Stop when the first stable ring begins, then reduce the level slightly.
- Identify the nearest EQ band and make a modest cut.
- Raise the level again and listen for the next limiting frequency.
- Stop when the required working level is stable or further EQ begins to damage the sound.
Stop when the system reaches the required working level. Do not continue only to find the maximum level. Performers, instruments, and an audience change the acoustic conditions. A system that is stable in an empty room may behave differently during the event.
Frequency recognition makes the adjustment faster
Moving an EQ fader is simple. Choosing the correct fader can be difficult. A 1.6 kHz ring may be mistaken for 2.5 kHz. The wrong cut changes the sound, but it does not reduce the main feedback frequency.
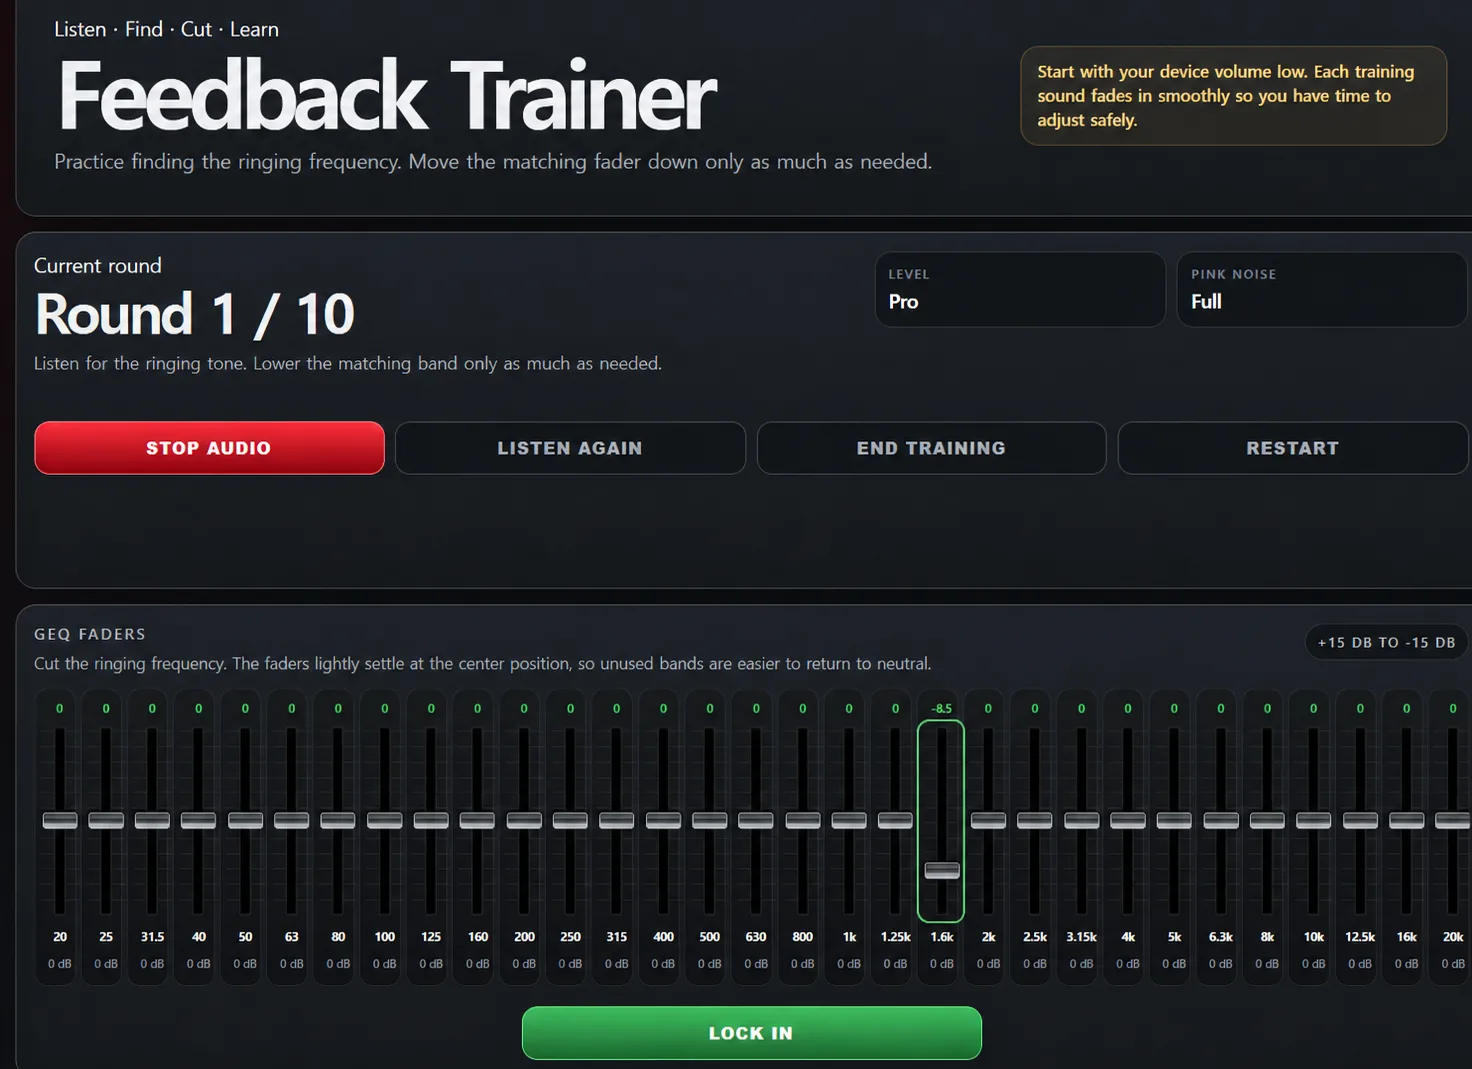
Repeated comparison improves frequency recognition. Listen to one ringing tone. Choose the closest frequency band. Make one controlled cut and check the result. With practice, broad descriptions such as low, mid, and high become more specific frequency ranges.
The SolAudioLab Feedback Trainer provides this practice in a web browser. Beginner mode uses 10 bands and gives guidance. Intermediate mode uses 15 bands with moderate pink noise. Pro mode uses 31 bands with full pink noise. Pro mode therefore depends more on listening. Listen Mode can play individual frequency bands before a scored session.
Start with a low device volume. Do not memorize one cut amount. Connect the pitch that you hear with the correct part of a graphic EQ. Then reduce that frequency without moving unrelated bands.
The practical takeaway
Microphone feedback is an acoustic loop. More gain makes feedback easier to start. Microphone placement and microphone technique affect the available level. The microphone polar pattern, room response, and number of open microphones also affect it.
Correct the largest physical problem first. Bring the microphone closer to the wanted source. Improve the loudspeaker and monitor angles. Close unused microphones. Make the monitor mix clearer. Then use EQ to reduce the remaining narrow frequency problem.
A precise feedback adjustment usually uses a small number of specific cuts. The system becomes more stable. The voice or instrument can keep its natural sound.